지난 Post에서는 git 개념을 설명했다면 지금은 git 사용시 편하게 사용할 수 있는 tool 중 3개 (bat, git-fuzzy, git-delta)를 소개하고자 한다. bat 과 git-fuzzy, git delta 는 단조로운 command line을 화려화게 사용할 수 있어 소스 코드의 가독성을 높이고, 보다 편리하게 git commit을 만들 수 있다. bat과 git-delta는 리눅스용/윈도우즈 빌드를 지원하고, git-fuzzy는 리눅스용 bash script이다. 즉, 우분투에서 3가지 tool 모두 사용가능하고, 윈도우에서는 윈도우즈용 빌드를 설치하고나 WSL 환경에서 사용해야 한다.
<지난 글>
[개발환경 만들기] 9. git 사용하기 #1 (부제: GitHub)
1. bat (cat 대신 사용가능한 syntax high light)
bat 의 GitHub 사이트는 https://github.com/sharkdp/bat 이다. 단조로운 UI의 cat 대신 사용 가능하고, 많은 프로그램언와 XLM, HTML등의 문법을 강조해서 화면에 표시해준다. 기존의 cat 명령어를 bat을 alais 해서 사용할 수 있다.
- Syntax highlighting: bat <file> 을 실행하면 확장자에 따라서 문법을 하이라이팅 하거나 강조 언어를 지정할 수 있다. (bat -L 로 확인 가능)
- Git integration: Git 과 연동해서 line 별 diff를 표시함
- non-printable 문자 표시: bat -A <file> 옵션으로 공백, 탭문자, LF, CF 문자를 표시 가능

설치
GitHub bat release 사이트 에서 최신 버전을 다운로드한다. 현 시점에서는 0.15.4 버전이 최신이기 때문에 우분투에서 bat_0.15.4_amd64.deb , Windows 는 bat-v0.15.4-x86_64-pc-windows-msvc.zip, MacOS는 bat-v0.15.4-x86_64-apple-darwin.tar.gz 받아서 설치하면 된다. deb 파일 설치 후 터미널에서 'bat --help'로 실행하면 되고, 'bat' 이 실행이 안된다면 'batcat'으로 실행하면 된다. 리눅스에 따라서 batcat으로 설치되는 경우도 있으니 확인이 필요하다.
# bat설치
$ sudo dpkg -i bat_0.15.4_amd64.deb # adapt version number and architecture

# 설치 확인
$ bat --help

#bat 실행이 안된다면
$ batcat --help

#아래와 같이 실행 버전 결과가 나와야 한다.
bat 0.15.4
A cat(1) clone with syntax highlighting and Git integration.
사용법
bat 사용법은 "bat <파일> or bat -A <file> " 처럼 cat 명령어 사용 방법과 동일하다. pipe를 사용해서 'git diff | bat' 과 같이 실행도 가능하다. bat를 cat의 alias를 설정하는 방법은 ~/.bashrc 파일을 수정하면 된다.
#Display a single file on the terminal
$ bat README.md

Display multiple files at once
$ bat src/*.rs

#Read from stdin, determine the syntax automatically (note, highlighting will only work if the syntax can be determined from the first line of the file, usually through a shebang such as #!/bin/sh)
$ curl -s https://sh.rustup.rs | bat

#Read from stdin, specify the language explicitly
$ yaml2json .travis.yml | json_pp | bat -l json

#Show and highlight non-printable characters:
$ bat -A /etc/hosts

#Use it as a cat replacement:
bat > note.md  # quickly create a new file
bat header.md content.md footer.md > document.md
bat -n main.rs  # show line numbers (only)
bat f - g  # output 'f', then stdin, then 'g'.

* 출처: https://github.com/sharkdp/bat
$ vim ~/.bashrc
# .bashrc 파일 하단에 alias 추가 후 저장
alias cat='bat'2. git-fuzzy (git add 시 파일 선택적으로 반영)
git-fuzzy 는 기존 git add 와 git reset 등 command line을 fzf를 사용해서 user interaction 이 가능하도록 만든 script이다. git staus, git log, git add. 의 함수를 GUI와 함께 사용할 수 있다. git-fuzzy 의 GitHub 사이트는 https://github.com/bigH/git-fuzzy이다.
설치
git-fuzzy 설치는 1) 탐색기 프로그램인 fzf 를 먼저 설치하고, 2) 다운로드한 git-fuzzy script를 ~/.local/bin으로 copy한다. 3) ~/.bashrc 파일을 열어서 git-fuzzy/bin 의 path를 추가하면 git 폴더에서 사용이 가능하다.
#fzf 설치
$ sudo apt install fzf
#github 에서 git-fuzzy 파일 다운로드
git clone https://github.com/bigH/git-fuzzy.git
# git-fuzzy 파일을 ~/.lcoal/bin으로 copy
mv ./git-fuzzy ~/.local/bin
# path 추가
$ vi ~/.bashrc
#.bashrc 파일 마지막에 path 추가하고 저장
PATH=$PATH:~/.local/bin/git-fuzzy/bin
# bashrc 적용
$ source ~/.bashrc
# Path 적용 확인
$echo $PATH
/home/kibua/.local/bin: (~중략~) /home/kibua/.local/bin/git-fuzzy/bin
#git 폴더로 이동해서
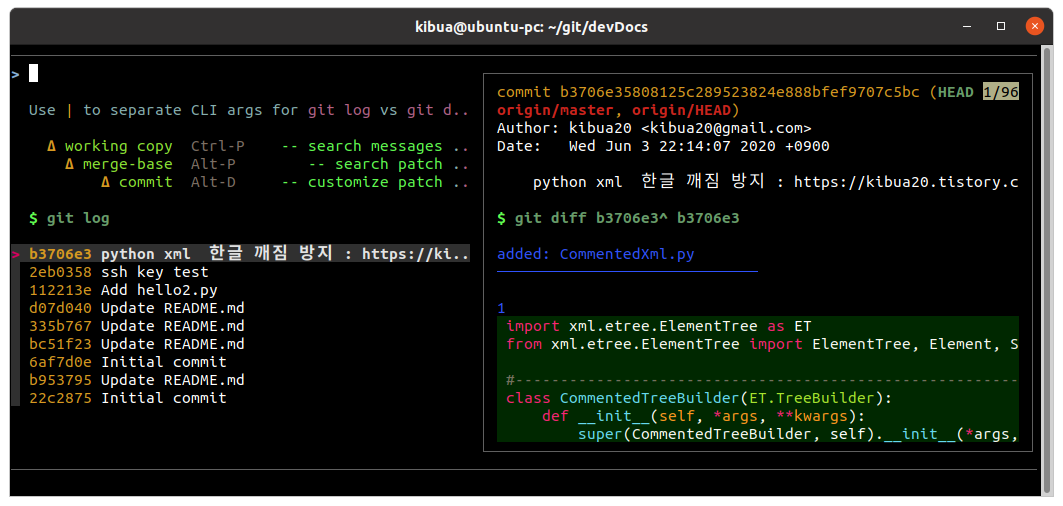
# git-fuzzy 실행사용법
git-fuzzy/bin 이 PATH가 정상적으로 잡혔다면, git이 있는 폴더에서 git-fuzzy를 실행하면 터미널에서 탐색기 UI를 표시해준다.
3. delta (git-delta)
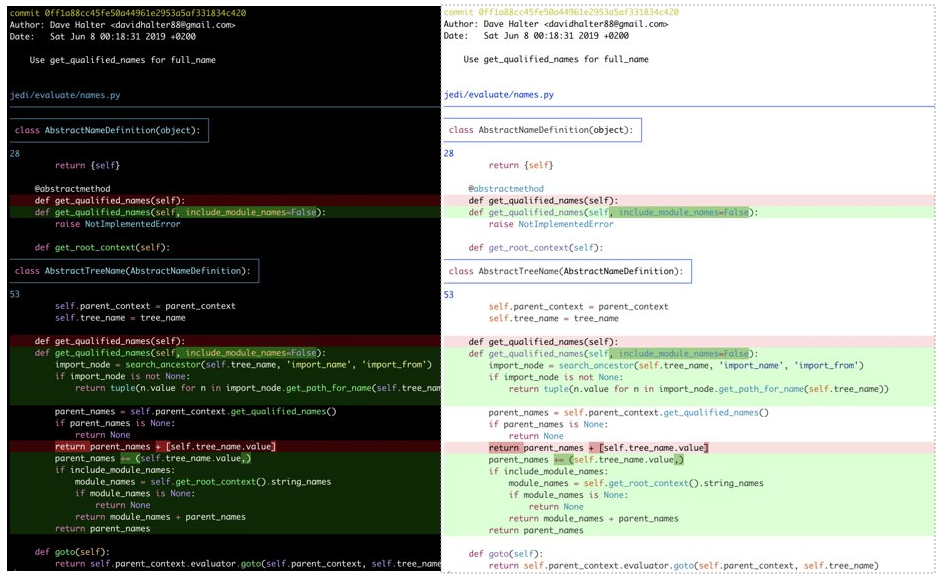
git-delta 은 diff 구분을 강조해주고, git paer로 지정이 가능하다. GitHub 사이트는 https://github.com/dandavison/delta 이다. 앞서 설명한 bat 과 git-delta 중 선호는 tool을 선택해서 사용해도 무방하다.
- git diff 의 출력을 구문강조
- 설치후 .gitconfig 에서 pager로 delta를 지정 가능 : git diff/show/log/stash/reflog/add 에 대해서 hightligt 됨
- pipe 가능 (e.g git diff | delta)
설치
git-delta의 GitHub 에서 최신 버전을 다운로드 한다. 우분투에서 git-delta_0.1.1_amd64.deb , Windows 는 delta-0.1.1-x86_64-pc-windows-gnu.zip , MacOS는 delta-0.1.1-x86_64-apple-darwin.tar.gz을 받아서 설치하면 된다. Windows에서는 less.exe 로 업데이트를 같이 설치해야 한다. (설치 위치: here)
# git-delta 설치
$ sudo dpkg -i git-delta_0.1.1_amd64.deb
사용 방법
기존 git command 뒤에 " | delta" 하면 pipe 로 전달된다. 필요 시 ~/.gitconfig 파일에 아래와 같이 추가할 수 있다.
$ git diff  | delta
$ git show  | delta
$ git log -p  | delta
$ git stash show -p | delta
$ git reflog -p | delta
$ git add -p | delta
# .gitconfig 파일에 추가 (필요 시)
[core]
pager = delta --plus-color="#012800" --minus-color="#340001" --theme='Monokai Extended'
[interactive]
diffFilter = delta --color-only
< 관련 글>
[개발환경] 9. git 사용하기 #1 (부제: GitHub)
[개발환경] 14. 우분투 터미널에 Putty 스타일 Copy&Paste 적용 (Terminator)
[개발환경] 13. 광고 없이 Youtube 동영상 다운로드 방법
[개발환경] 10. Ubuntu에서 Microsoft 365 '무료'로 사용하기
[개발환경][Tips] Ubuntu 20.04 키 모음 잠금 풀기 (부팅 후에 표시하지 않도록 수정하기)
[개발환경] 8. Ubuntu 테마 설치 (맥분투 만들기)
[개발환경][Tips] 우분투 단축키 (화면 캡쳐, 화면 녹화)
댓글