Flutter에서 TextField와 TextFormField 필드에서 Style을 추가하는 방법입니다. 공식 문서는 Create and style a text field에 설명되어 있습니다. TextFormField는 TextField을 Form으로 감싼 것이기 때문에 사용법은 동일합니다. Flutter 버전에 따라서 문법이 변경될 수 있기 때문에 버전에 맞는 문법을 사용해주세요. 본 포스팅과 함께 Form의 Validation 사용법도 참고하세요.
TextField와 TextFormField에 아이콘 추가, Label text, HInt Text 추가
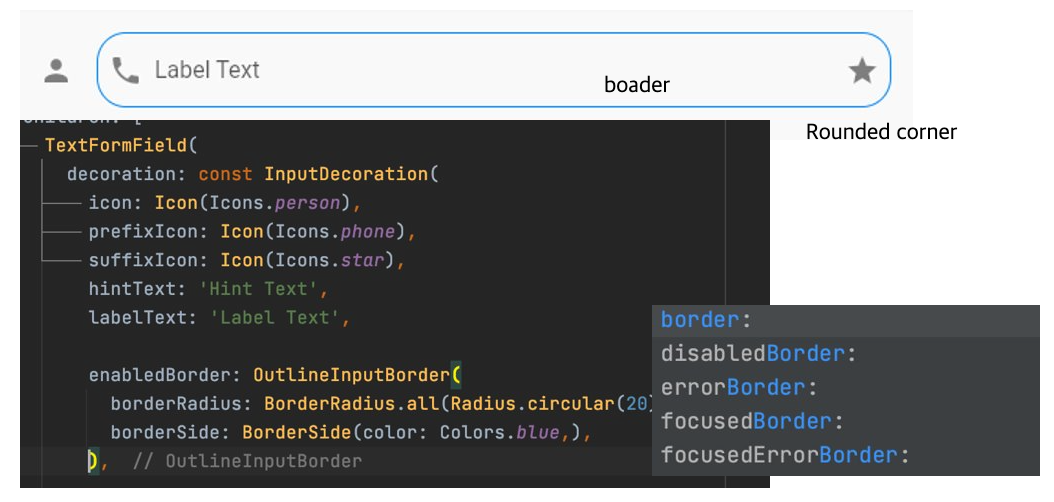
TextField 또는 TextFormField에 Style을 추가하기 위해서는 decoration을 InputDecoration()으로 설정합니다. InputDecoration에서 icon, prefixIcon, suffixIcon, hintText, labelText를 설정할 수 있습니다.

TextFormField(
  decoration: const InputDecoration(
    icon: Icon(Icons.person),
    prefixIcon: Icon(Icons.phone),
    suffixIcon: Icon(Icons.star),
    hintText: 'Hint Text',
    labelText: 'Label Text',
  ),
),
TextField와 TextFormField에 Prefix Text와 SuffixText추가
TextField와 TextFormField에 사전에 설정한 문자열을 prefixText와 suffixText를 통해서 설정할 수 있습니다.

TextFormField(
  decoration: const InputDecoration(
    icon: Icon(Icons.person),
    prefixIcon: Icon(Icons.phone),
    suffixIcon: Icon(Icons.star),
    hintText: 'Hint Text',
    labelText: 'Label Text',
    prefixText: 'PrefixText',
    suffixText: 'Suffixtext',
  ),
),
TextField와 TextFormField에 외곽선 추가 및 Round 추가
외곽선 스타일은 InputDecoration에서 border, enabledBoarder, disabledBoard을 추가합니다.
TextFormField(
  decoration: const InputDecoration(
    icon: Icon(Icons.person),
    prefixIcon: Icon(Icons.phone),
    suffixIcon: Icon(Icons.star),
    hintText: 'Hint Text',
    labelText: 'Label Text',
    enabledBorder: OutlineInputBorder(
      borderRadius: BorderRadius.all(Radius.circular(20)),
      borderSide: BorderSide(
        color: Colors.blue,
      ),
    ),
  ),
),
TextField와 TextFormField에 색상 넣기
텍스트 입력 필드의 색상 추가는 filled: true로 설정하고 fillColor에 원하는 색상을 지정합니다.

TextFormField(
  decoration: const InputDecoration(
    icon: Icon(Icons.person),
    prefixIcon: Icon(Icons.phone),
    suffixIcon: Icon(Icons.star),
    hintText: 'Hint Text',
    labelText: 'Label Text',
    enabledBorder: OutlineInputBorder(
      borderRadius: BorderRadius.all(Radius.circular(20)),
      borderSide: BorderSide(
        color: Colors.blue,
      ),
    ),
    filled: true,
    fillColor: Colors.amberAccent,
  ),
),
Sample Code
앞에서 설명한 내용의 전체 소스 코드입니다. GitHub에 flutter/a02form폴더의 main_textfiled.dart에 올렸습니다.
import 'package:flutter/material.dart';

void main() {
  runApp(const MyApp());
}

class MyApp extends StatelessWidget {
  const MyApp({Key? key}) : super(key: key);

  // This widget is the root of your application.
  @override
  Widget build(BuildContext context) {
    return const MaterialApp(
      title: 'Flutter Demo',
      home: FormScreen(title: 'Flutter Form Validation'),
    );
  }
}

class FormScreen extends StatefulWidget {
  const FormScreen({Key? key, required this.title}) : super(key: key);
  final String title;

  @override
  State<FormScreen> createState() => _FormScreenState();
}

class _FormScreenState extends State<FormScreen> {
  @override
  Widget build(BuildContext context) {
    return Scaffold(
      appBar: AppBar(
        title: Text(widget.title),
      ),
      body: Column(
        mainAxisAlignment: MainAxisAlignment.start,
        crossAxisAlignment: CrossAxisAlignment.start,
        children: [
          Padding(
              padding: const EdgeInsets.all(20),
              child: Column(
                children: [
                  TextFormField(
                    decoration: const InputDecoration(
                      icon: Icon(Icons.person),
                      prefixIcon: Icon(Icons.phone),
                      suffixIcon: Icon(Icons.star),
                      hintText: 'Hint Text',
                      labelText: 'Label Text',
                    ),
                  ),
                  Padding(padding:  const EdgeInsets.fromLTRB(0, 0, 0, 20),),

                  TextFormField(
                    decoration: const InputDecoration(
                      icon: Icon(Icons.person),
                      prefixIcon: Icon(Icons.phone),
                      suffixIcon: Icon(Icons.star),
                      hintText: 'Hint Text',
                      labelText: 'Label Text',
                      prefixText: 'PrefixText',
                      suffixText: 'Suffixtext',
                    ),
                  ),

                  Padding(padding:  const EdgeInsets.fromLTRB(0, 0, 0, 20),),

                  TextFormField(
                    decoration: const InputDecoration(
                      icon: Icon(Icons.person),
                      prefixIcon: Icon(Icons.phone),
                      suffixIcon: Icon(Icons.star),
                      hintText: 'Hint Text',
                      labelText: 'Label Text',
                      enabledBorder: OutlineInputBorder(
                        borderRadius: BorderRadius.all(Radius.circular(20)),
                        borderSide: BorderSide(
                          color: Colors.blue,
                        ),
                      ),
                    ),
                  ),

                  Padding(padding:  const EdgeInsets.fromLTRB(0, 0, 0, 20),),
                  TextFormField(
                    decoration: const InputDecoration(
                      icon: Icon(Icons.person),
                      prefixIcon: Icon(Icons.phone),
                      suffixIcon: Icon(Icons.star),
                      hintText: 'Hint Text',
                      labelText: 'Label Text',
                      enabledBorder: OutlineInputBorder(
                        borderRadius: BorderRadius.all(Radius.circular(20)),
                        borderSide: BorderSide(
                          color: Colors.blue,
                        ),
                      ),
                      filled: true,
                      fillColor: Colors.amberAccent,
                    ),
                  ),
                ],
              )),
        ],
      ),
    );
  }
}
관련 글:
[SW 개발/FrontEnd(Flutter)] - Flutter 특징과 개발환경 설정 방법
[SW 개발/FrontEnd(Flutter)] - Android Studio와 Visual Code로 Flutter Project 프로젝트 생성
[SW 개발/FrontEnd(Flutter)] - Flutter Parent-Child Widget 간 State 전달과 업데이트 방법
[SW 개발/FrontEnd(Flutter)] - Flutter에서 Widget Tree와 layout 디자인 방법
[SW 개발/FrontEnd(Flutter)] - Flutter에서 Material UI Icon과 Cupertino Icon 검색하고 사용하기
[SW 개발/FrontEnd(Flutter)] - Flutter 사용자 입력 값 검증 위한 Form validation과 TextFormField (Sample code)
[SW 개발/Python] - Selenium 4.0 개선 사항 정리 - WebDriver 자동 로딩 가능
[SW 개발/Android] - 안드로이드 adb 설치 및 설정 방법
[개발환경/Web Server] - Web Server 성능 및 Load 측정 Tool: Apache AB (Apache Http Server Benchmarking Tool)
[SW 개발/Python] - Python: JSON 개념과 json 모듈 사용법
댓글