작업 동기
Command line으로 email 전송 프로그램이 필요해서 Gmail API와 Python를 사용해서 sendmail() 함수를 구현하였다. Python으로 구현한 sendmail() 함수의 1차 구현은 아래와 같이 sender, to, subject, attachment, message를 파라미터를 받는 함수로 구현하였다. 앞에 4개 인자(sender, to, subject, attachment)는 까지는 함수 호출을 한 줄로 끝낼 수 있지만, mesaage (=email 내용)은 경우에 따라서 매우 길어져서 다른 방법을 찾아야 했다. 기존에 Postfix와 sendmail과 mail의 호출 예를 보니, bash의 | 와 <<< 으로 표준 입출력 (stdin)으로 연동하고 있는 것을 확인했고, 동일한 방법으로 적용하기로 했다.
1. sendmail.py 1차 구현
sendmail (sender, to, subject, attachement, message)
sender: 보낸 사람 email
to: 받는 사람 email
subject: email 제목
attachment: 첨부파일 path (full path)
message: email 내용 --> 한 줄로 해결 안됨, 기존의 리눅스 cat | <<< 명령어와 연동해야 한다.
2. Postfix 의 sendmail과 mail 호출 예
기존 프로그램의 postfix의 sendmail과 mail 유틸리티에서는 message 를 stdin 을 통해서 입력 받는다.
$ sendmail user@example.com <<< "Subject: Terminal Email Send\n\nEmail Content line 1\nEmail Content line 2"
$ mail -s "메일 테스트" user@example.com <<< '메일 본문입니다'
$ echo "Test mail from postfix" | mail -s "Test Postfix" user@example.com
3. sendmail.py 최종 구현 방향
message의 내용은 ./sendmail.py의 함수 인자에서 표준 입력(stdin)으로 변경하기로 했다..
./sendmail.py [to] [subject] [*attachment] < message * is opitonal'
$ ./sendmail.py address@gmail.com testsubject <<< "message cotents in html"
$ cat message_file | ./sendmail.py address@lge.com subject
표준 입출력 기본 개념
C언어를 배운 사람이라면 가장 처음 추가하는 코드가 아래와 같이 #include <stdio.h>이다. stdio(=표준 입출력)을 통해서 콘솔에서 문자를 출력한다. 위키피디아에서는 표준 입출력을 아래와 같이 설명하고 있다.
#include<stdio.h>
void main()
{
printf('helllo world');
}
(출처: 위키피디아)
표준 스트림(standard streams)은 특정한 프로그래밍 언어 인터페이스뿐 아니라 유닉스 및 유닉스 계열 운영 체제(어느 정도까지는 윈도에도 해당함)에서 컴퓨터 프로그램과 그 환경(일반적으로 단말기) 사이에 미리 연결된 입출력 통로 (pipe)를 가리킨다.
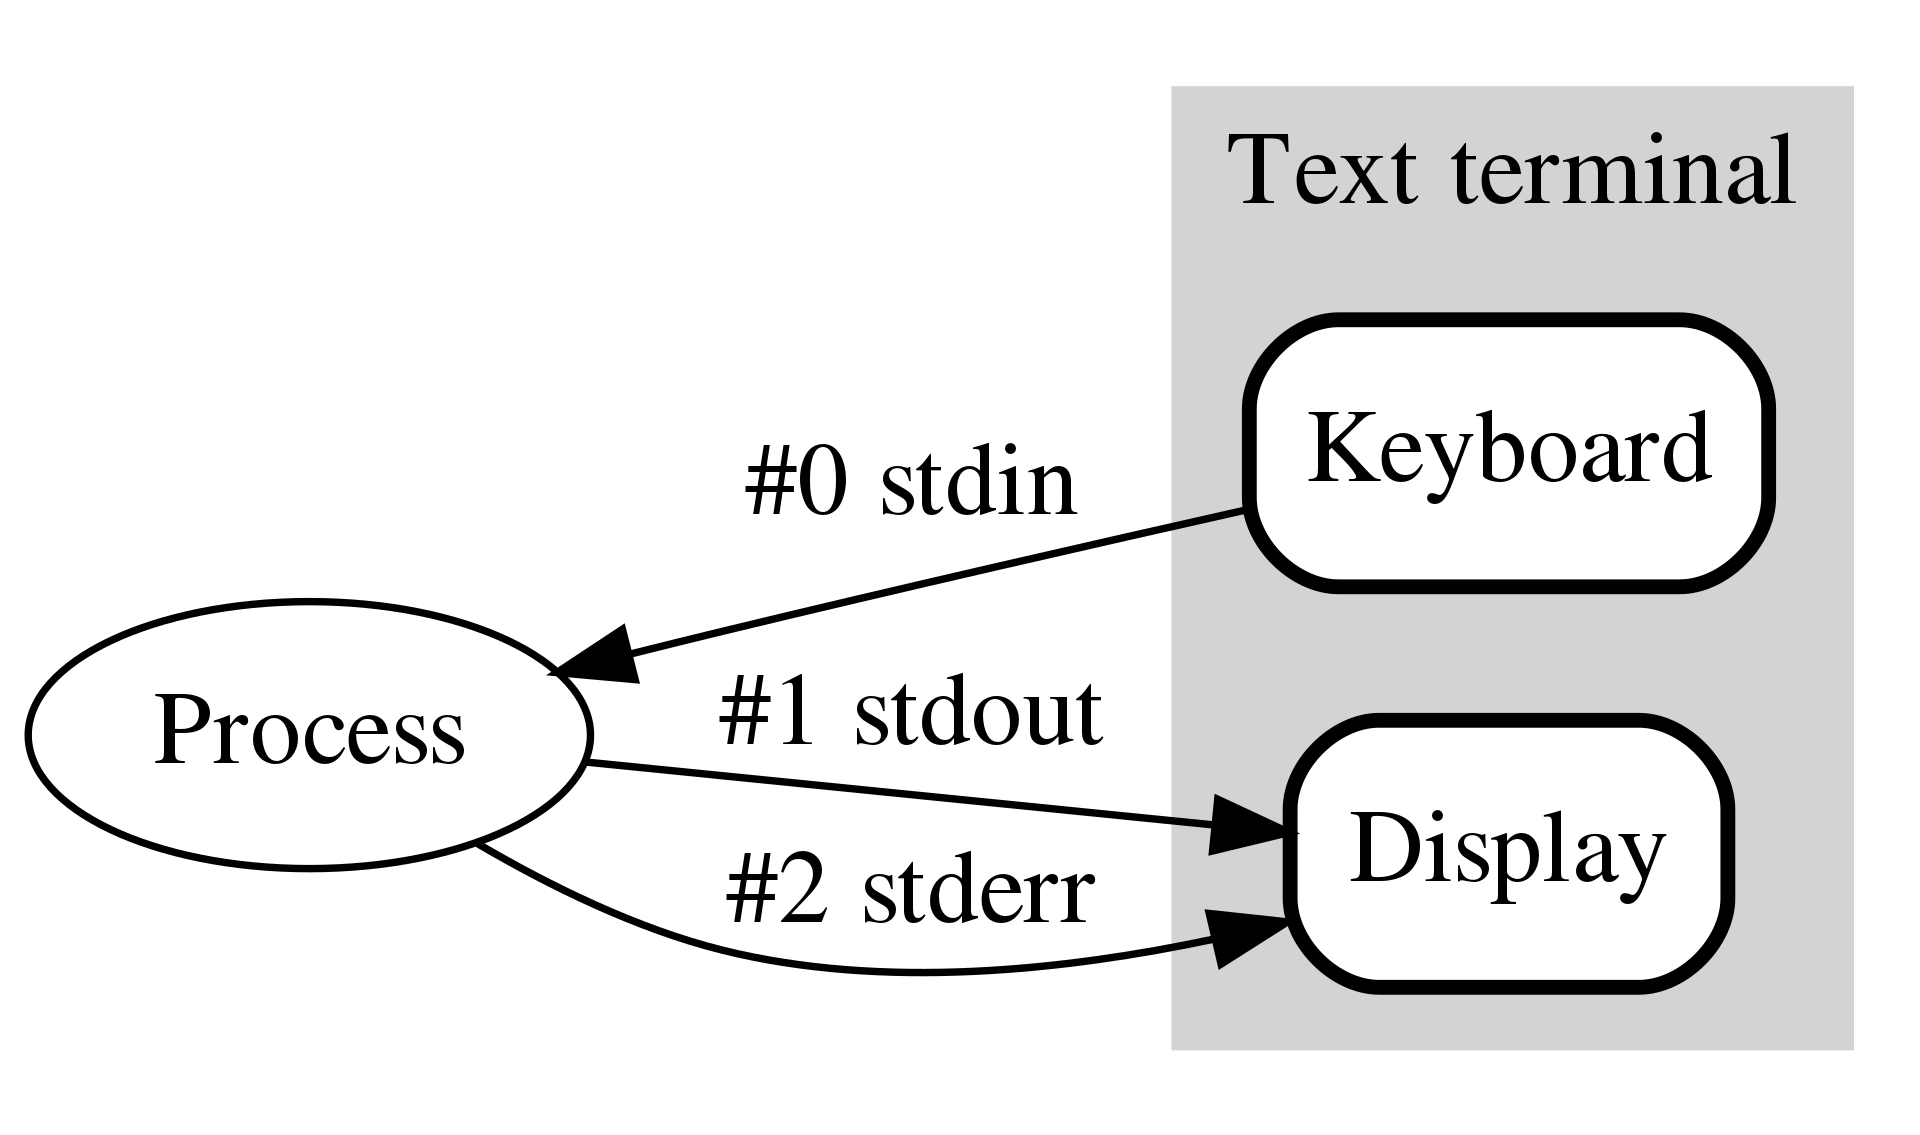
일반적으로 유닉스에서 동작하는 프로그램은 실행 시 세 개의 스트림이 자동으로 열린다. 이를 표준 스트림이라고 부른다. 하나는 입력을 위한 스트림(Standard input, STDIN, 0), 하나는 출력을 위한 스트림 (Standard Output, STDOUT, 1), 하나는 오류 메시지를 출력하기 위한 스트림(Standard Error, STDERR, 2)이며, 이 세 개의 표준 스트림은 사용자의 터미널에 부착된다.
(중략)
표준 C 실행 라이브러리의 <stdio.h> 헤더에서 stdin, stdout, stderr로 정의된다. 파일 디스크립터 0, 1, 2로 표현하기도 한다.
Python에서 표준 입출력
Python에서는 표준 입출력은 sys 모듈을 통해서 지원한다. py 파일에서 import sys를 하고, sys.stdin과 sys.stdout으로 사용 가능하다. 물리적으로는 utf8로 encoding 된 string buffer이고, 사용 방법은 일반 파일 (FILE)과 동일하게 취급하면 된다.
sys.stdin - 입력 버퍼, 입력 버퍼가 없으면 키보드 입력
sys.stdout - 출력 버퍼, 출력 버퍼가 지정되어 있지 않으면 터미널 출력 (표준 출력)
sys.stderr - 출력 버퍼, 출력 버퍼가 지정되어 있지 않으면 터미널 출력 (에러 출력)
아래는 Python 코드는 표준 입력 버퍼를 읽어 표준 출력으로 print 하는 샘플 파일이다.
#!/usr/bin/env python3
# -*- coding:utf-8 -*-

import sys

# https://github.com/kibua20/devDocs/blob/master/test_stdio.py

def test_stdio():
    print (sys.stdin)
    print ('python arguments: ')
    for i in range(1, len(sys.argv)):
        print('\t', sys.argv[i])

    print ('stin buffer: ')
    buffer = bytearray()
    if sys.stdin.isatty():
        print ('terminal mode: do nothing')
    else:
        buffer=sys.stdin.read()

    print (buffer)


if __name__ == "__main__":
    test_stdio()
print(sys.stdin)의 결과
TextIOWrapper 타입으로 이름은 stdin, readonly mode에, utf-8로 encding 되어 있음 확인할 수 있다.
<_io.TextIOWrapper name='<stdin>' mode='r' encoding='utf-8'>
stdin buffer 읽어오기
일반 text 파일과 동일하게 read()를 사용해서 buffer를 가져올 수 있다.
buffer=sys.stdin.read()
터미널 키보드 입력과 pipe를 통한 buffer 입력 구분하기
stdin.istty() 함수를 사용해서 키보드 입력과 buffer 입력을 구분할 수 있다.
if sys.stdin.isatty():
print ('terminal mode: do nothing')
else:
# piped or redirected.
buffer=sys.stdin.read()
/dev/null 입출력
/dev/null을 pipe로 전달하면 stdin 인 경우에는 Null을 입력받고, 표준 출력 (stdio)인 경우에는 출력을 삭제한다.
print(buffer)에 대한 해석

stdio에 대한 test는 아래와 같은 test script을 참고할 수 있고, GitHub에 올라가 있다.
링크: https://github.com/kibua20/devDocs/blob/master/testcase.sh
echo "ls > sample.txt result:"
echo "sample text from stdin" > sample.txt

echo "ls | ./test_stdio.py result:"
ls | ./test_stdio.py argument#1 argument#2

echo "cat sample.txt | ./test_stdio.py result:"
cat sample.txt | ./test_stdio.py argument#1 argument#2

echo "./test_stdio.py <<< Test stdio result:"
./test_stdio.py argument#1 argument#2 <<< "Test stdio"

echo "./test_stdio.py < sample.txt result:"
./test_stdio.py argument#1 argument#2 < sample.txt

echo "./test_stdio.py < /dev/null  (NULL test) result"
./test_stdio.py argument#1 argument#2 < /dev/null
<관련 글>
[모바일/Python] - Python 표준 입출력 stdin / stdout: 리눅스 프로그램과 연동
[모바일/Python] - Python JSON 사용 시 TypeError: Object of type bytes is not JSON serializable
[모바일/Python] - Python smtplib 사용한 email 발송 예제 (gmail)
[모바일/Python] - Python SyntaxError: Non-ASCII character in file on, but no encoding declared
[모바일/Python] - Python 2.7과 3.8호환성: a bytes-like object is required, not 'str'에러 수정
[모바일/Python] - [Tips] Python: XML Parsing 시 multiple elements on top level
[모바일/Python] - [Tips] Python 에서 XML comment 처리 - Sample code 제공
[모바일/Python] - [Tips] XML 에서 예약/특수 문자 처리
[개발환경] - Ubuntu 에서 SW 개발 Tool 설치
댓글