다중 분류(Multi-class classification) 문제는 다수의 독립 변수(X)와 다수의 종속 변수(Y)가 있다면 Y의 값이 1 or 0으로 구분되는 Binary classification 대비 2개 이상의 값을 가지는 가질 수 있는 분류 문제입니다. Keras에서 다중 분류 사용하기 위해서는 Softmax활성화 함수, One Shot encoding, 비용 함수 Categorical Cross-entropy를 사용해야 합니다.
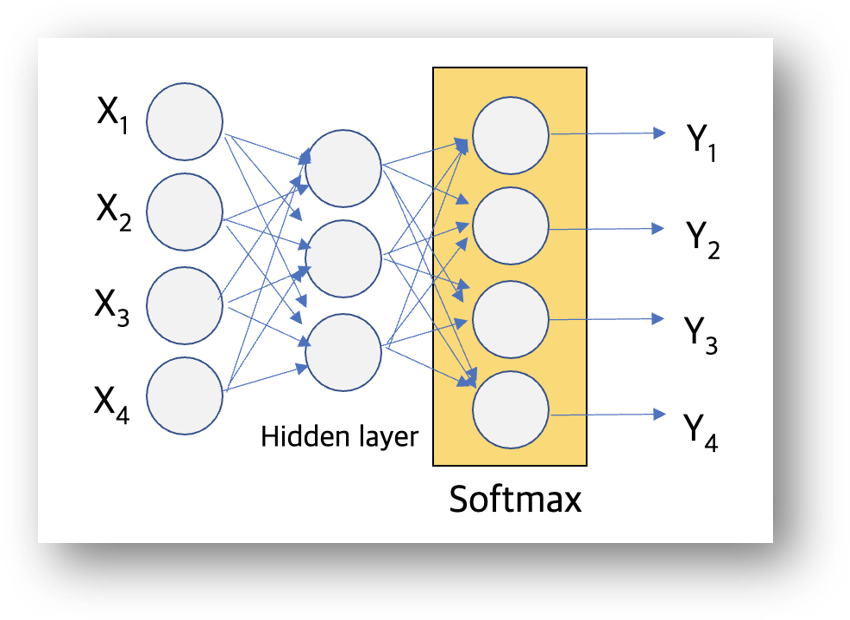
SoftMax 활성화 함수
Sigmoid 활성화 함수가 Binary Classification에서 사용한다면, Softmax 함수는 다중 classification의 활성화 함수로 사용됩니다. 수학적 정의는 링크 1을 링크 2 참고해주세요.
| SoftMax 활성화 함수 | Sigmoid 활성화 함수 |
| 다중 분류 문제 | Binary 분류 문제 (Logistic regression) |
| 계산된 확률은 0~1 사이의 값을 가지고, 확률 값의 총합은 1 | 확률 값의 총 합은 1이 아님 (모든 실수 값에 대해서 0~1 사이의 값을 가짐) |
Label Encoder와 One-Hot Encoding
Machine Learning은 문자를 그대로 처리할 수 없어 숫자로 변환하는 과정이 필요합니다. Label Encoder는 임의의 문자열을 중복되지 않은 숫자로 변환하는 방법입니다. One-Hot encodig은 분류 항목을 1,0으로 구성된 독립된 벡터로 구성하는 방법입니다.
예를 들어 dog, cat, bird, fish의 array가 있다면 label encoder는 알파벳 순서에 따라서 0, 1, 2, 3으로 변환합니다. 인코딩 순서에는 특별한 의미는 없으며 순서에 따라서 문자열을 숫자로만 변환합니다. Label Encoder는 python sklearn library의 LabelEncoder로 쉽게 변환할 수 있습니다.
One-hot encoding은 [2, 1, 0, 3] 값을 1과 0으로 구성된 독립된 vector로 만드는 작업입니다. Python code에서는 keras.utils.t
to_categorical() 함수를 사용하거나, pandas.get_dummies() 함수로 구현할 수 있습니다.
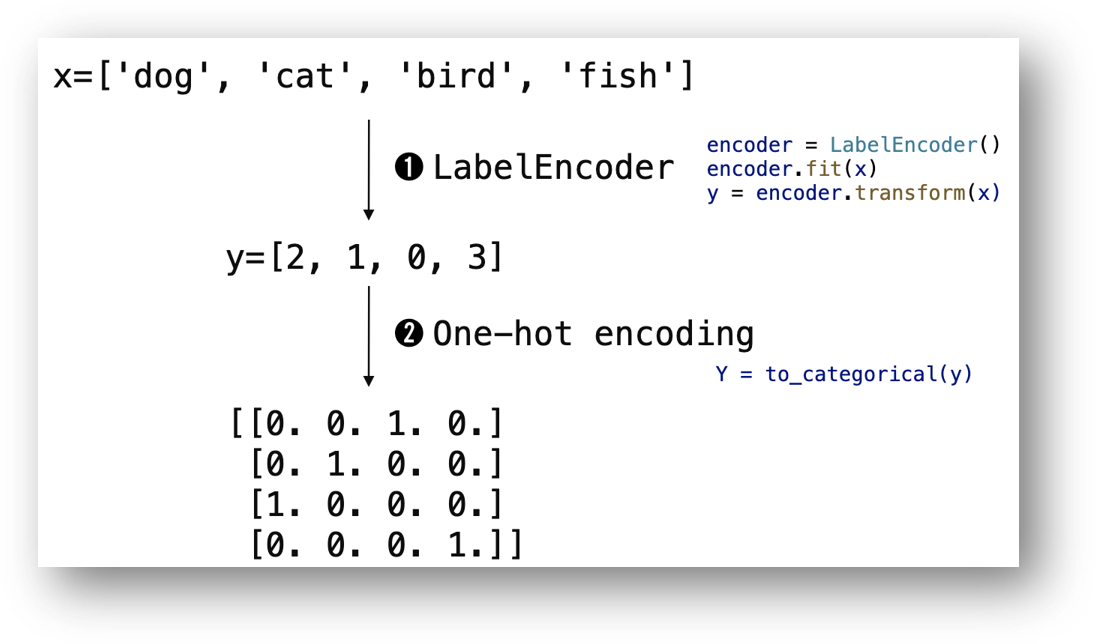
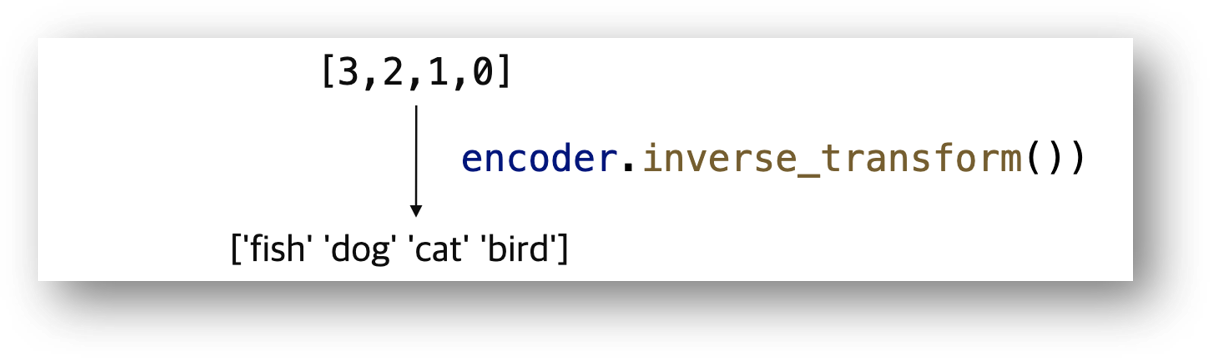
Label Encoding된 값을 다시 원래의 string으로 역변환하는 것은 sklearn encoder의 inverse_transform() 함수를 사용할 수 있습니다. [3, 2, 1, 0] 값을 encoder.inverse_tranform()으로 변환하는 ['fish], 'dog', 'cat', 'bird'] list로 변환합니다.
Lable encoder와 One-hot encder의 Python 테스트 code는 아래와 같습니다.
from sklearn.preprocessing import LabelEncoder

def test_onehot_encode():
    x = np.array(['dog', 'cat', 'bird', 'fish'])

    # label encoder :  text를 숫자로 인코딩
    encoder = LabelEncoder()
    encoder.fit(x)
    y = encoder.transform(x)
    print ('label')
    print (y)

    # one hot encoding - 독립된 1,0 으로 encoding
    print ('to_categorical()')
    Y = to_categorical(y)
    print (Y)

    # label decoder : 숫자를 텍스트로 인코딩
    print ('decoding():')
    print (encoder.inverse_transform([3,2,1,0]))
일반적으로 One-hot 인코딩을 주로 사용하지만, Label Ending과 One Hot 인코딩의 차이점은 다음과 같습니다.
| Label encoding | One-Hot encoding |
| 순서에 의미가 있을 때 (예를 들어, 초등, 중등, 고등, 대학) | 순서가 없을 때 |
| 고유값이 개수가 많을 때 | 고유 값의 개수가 많지 않을 때 |
| sktlearn의 Label Encoder | sktlearn의 Label Encoder + keras의 to_categorical () pandas의 get_dummies() |
비용 함수: Cross Entropy 함수
Softmax의 비용 함수는 Cross-Entropy함수를 사용합니다. 이진 분류의 Binary cross entropy 함수는 Cross Entropy 함수에서 분류 조건의 개수가 2인 경우입니다. 수학적인 내용은 링크를 참조해주세요.
Keras으로 Iris Data Set의 다중 분류
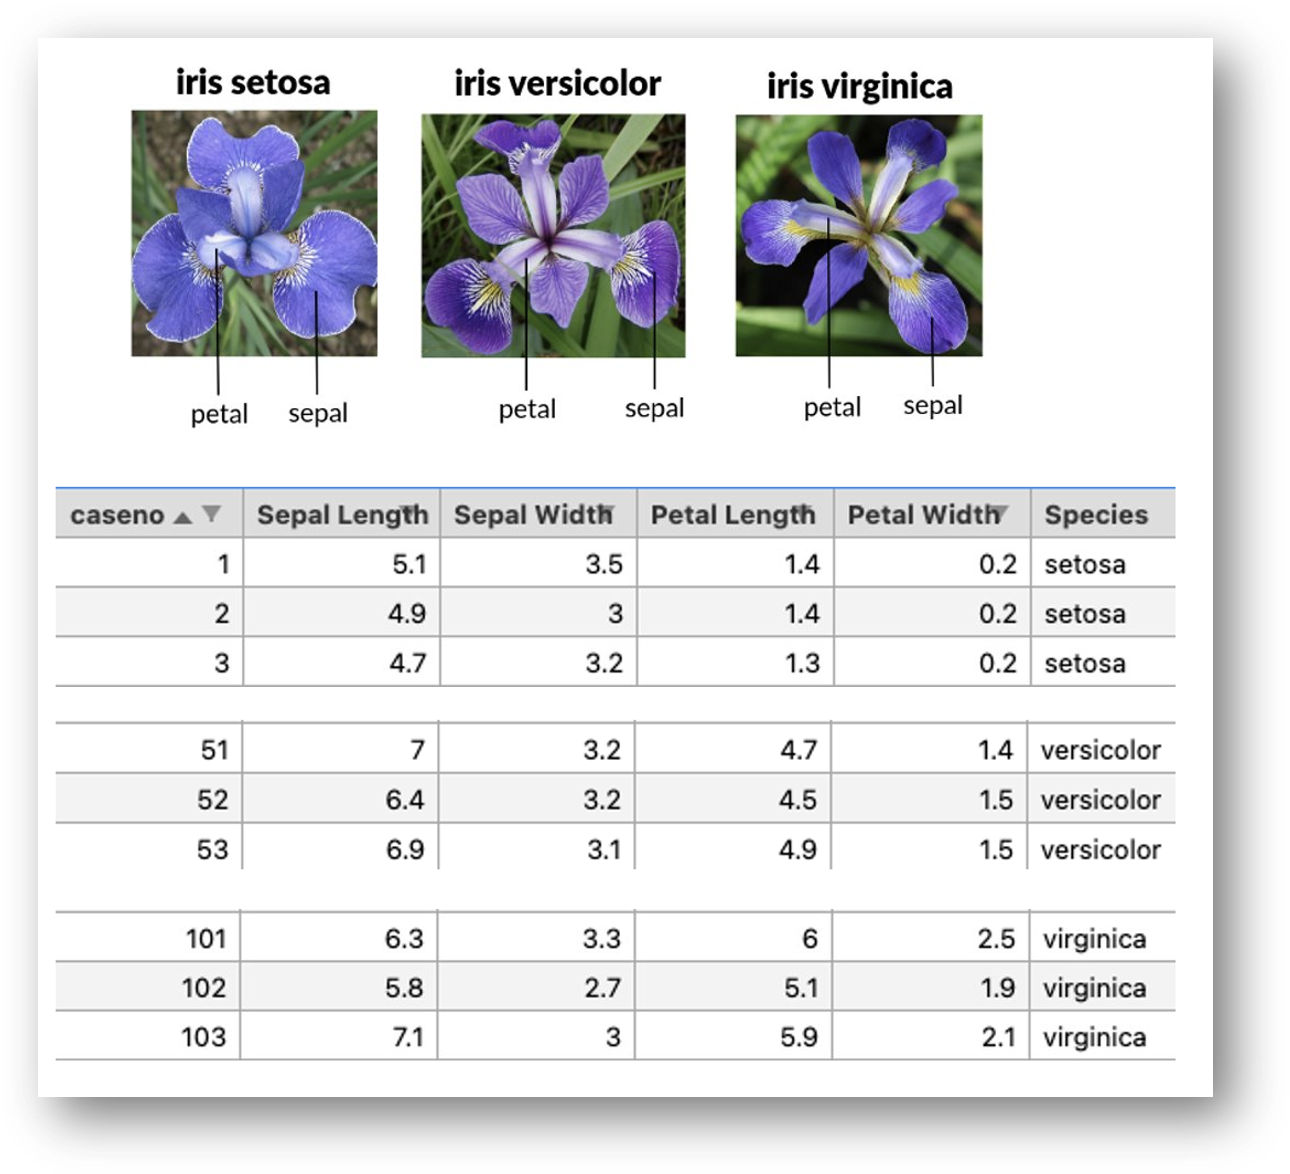
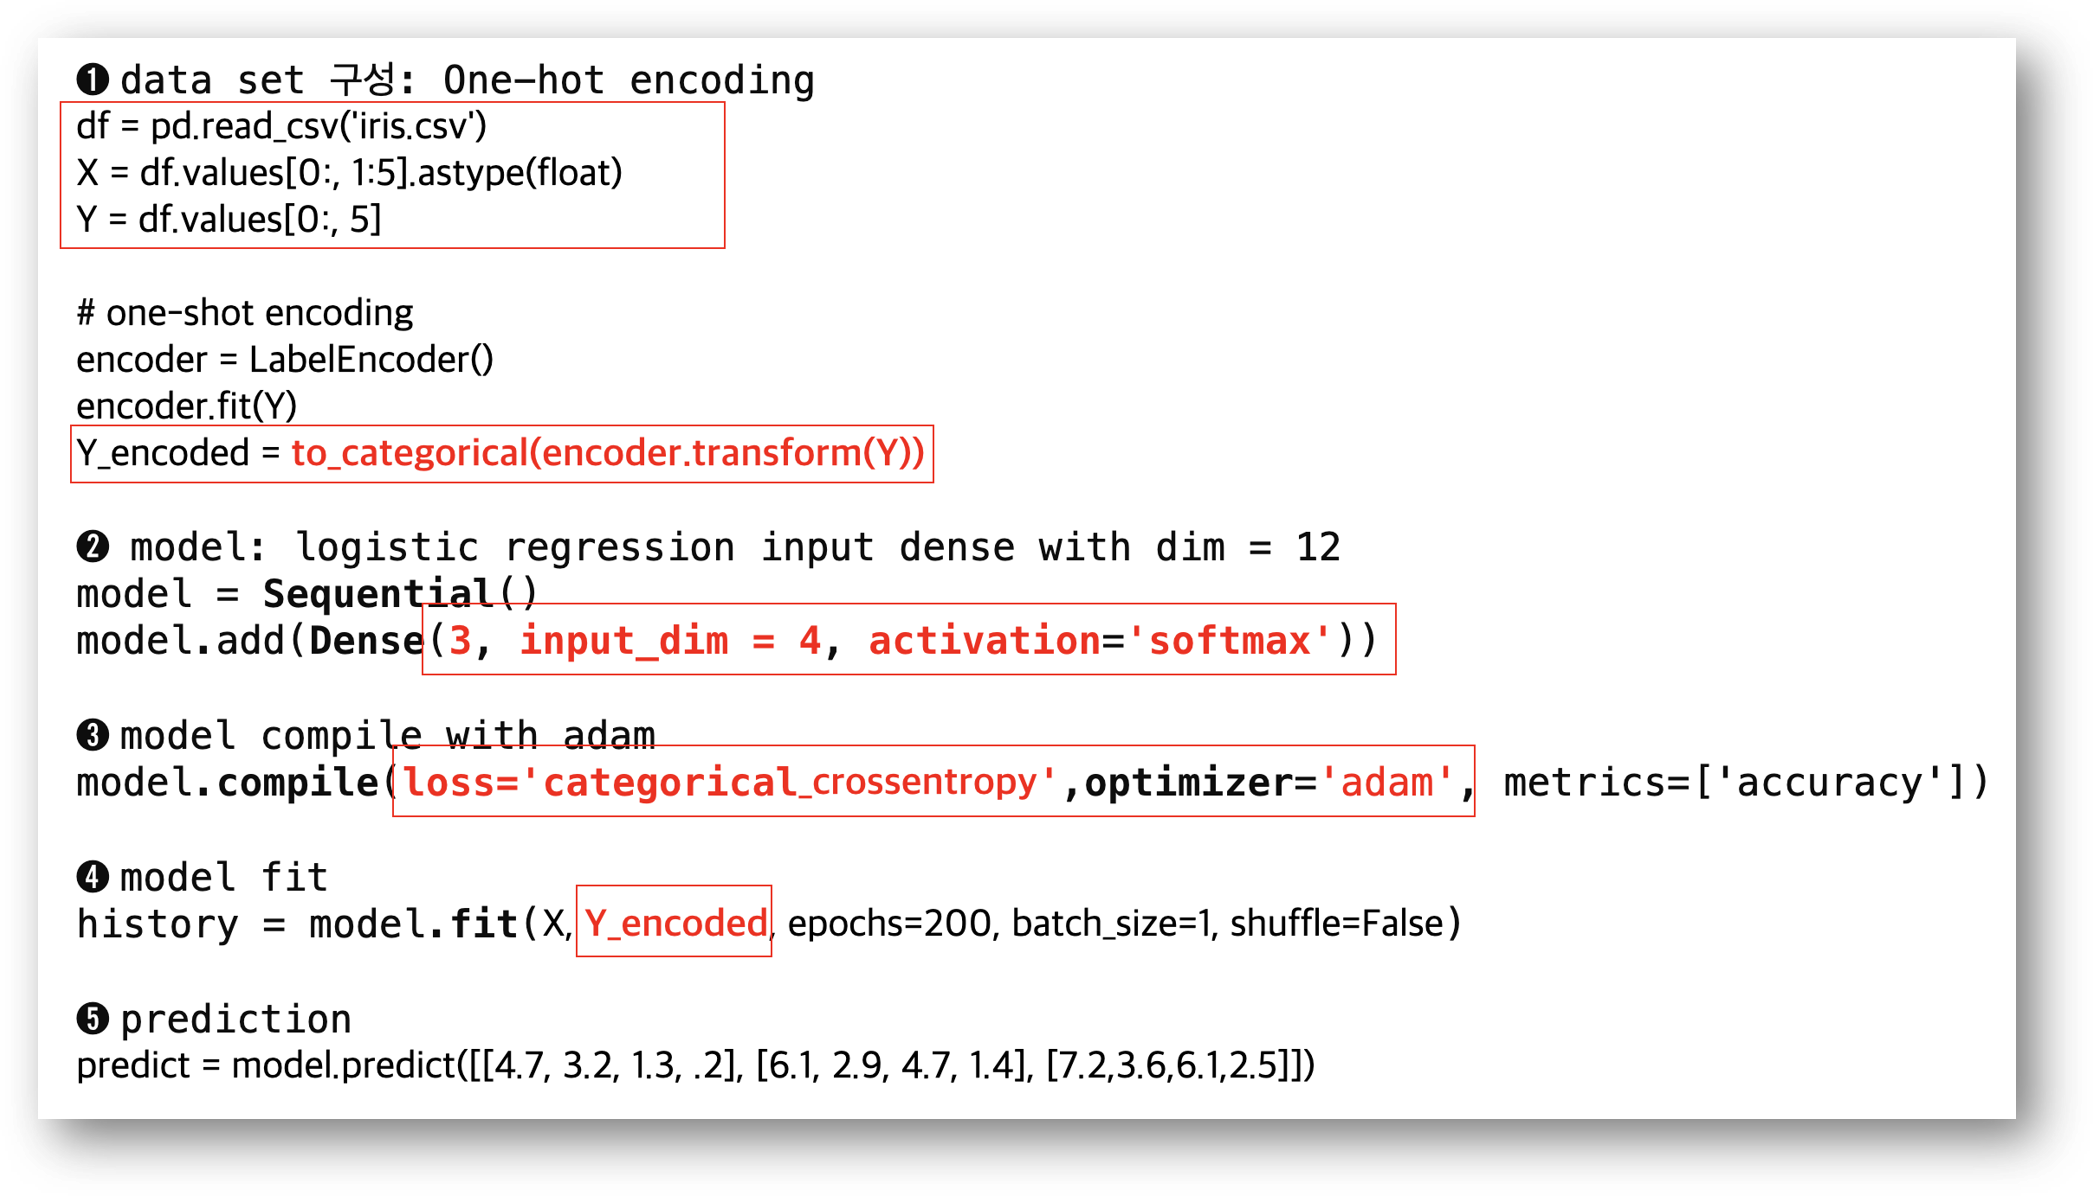
Iris Data Set의 다중 분류 예제입니다. Iris data는 너무나 유명한 데이터 셋이라 잘 분석된 내용(링크)이 많습니다. Iris data set은 잎의 sepal width / length와 petal width / length에 따라서 setosa, versicolor, virginica로 구분됩니다. 4개의 독립 변수와 1개의 종속 변수로 구성되어 있습니다. Iris Data set은 총 150개의 row로 구성되어 있고, 1~50번까지는 setosa, 51~100번 까지는 versicolor, 101~150번은 vriginica의 측정값입니다. (아래 그림)
iris.csv 파일을 GitHub에 공유하였습니다. Pandas로 iris.csv파일을 로딩합니다. 독립 변수(X)는 1번부터 5번 Column의 값들이고, 종속변수(Y)는 6번째 column('Species')입니다. 'Species' column의 값은 'setosa', 'versicolor', 'virginica'의 string으로 저장되어 있어 이를 0과 1의 One-hot encoding을 수행합니다. One-shot encoding은 앞에서 설명한 to_categorical() 함수를 사용합니다.
Keras 모델은 구성은 input_dim은 4 (sepal length, sepal width, petal width, petal length)이고, output dim은 3 (setosa, versicolor, virginica)으로 전달합니다. 활성화 함수는 'softmax'로 설정하고, loss 함수는 'categorical_crossentropy'를 사용합니다.
각 Parameter의 기계 학습은 model.fit() 함수로 진행합니다. 이때 fit() 함수 호출 시 one-shot encoding 값으로 전달합니다.
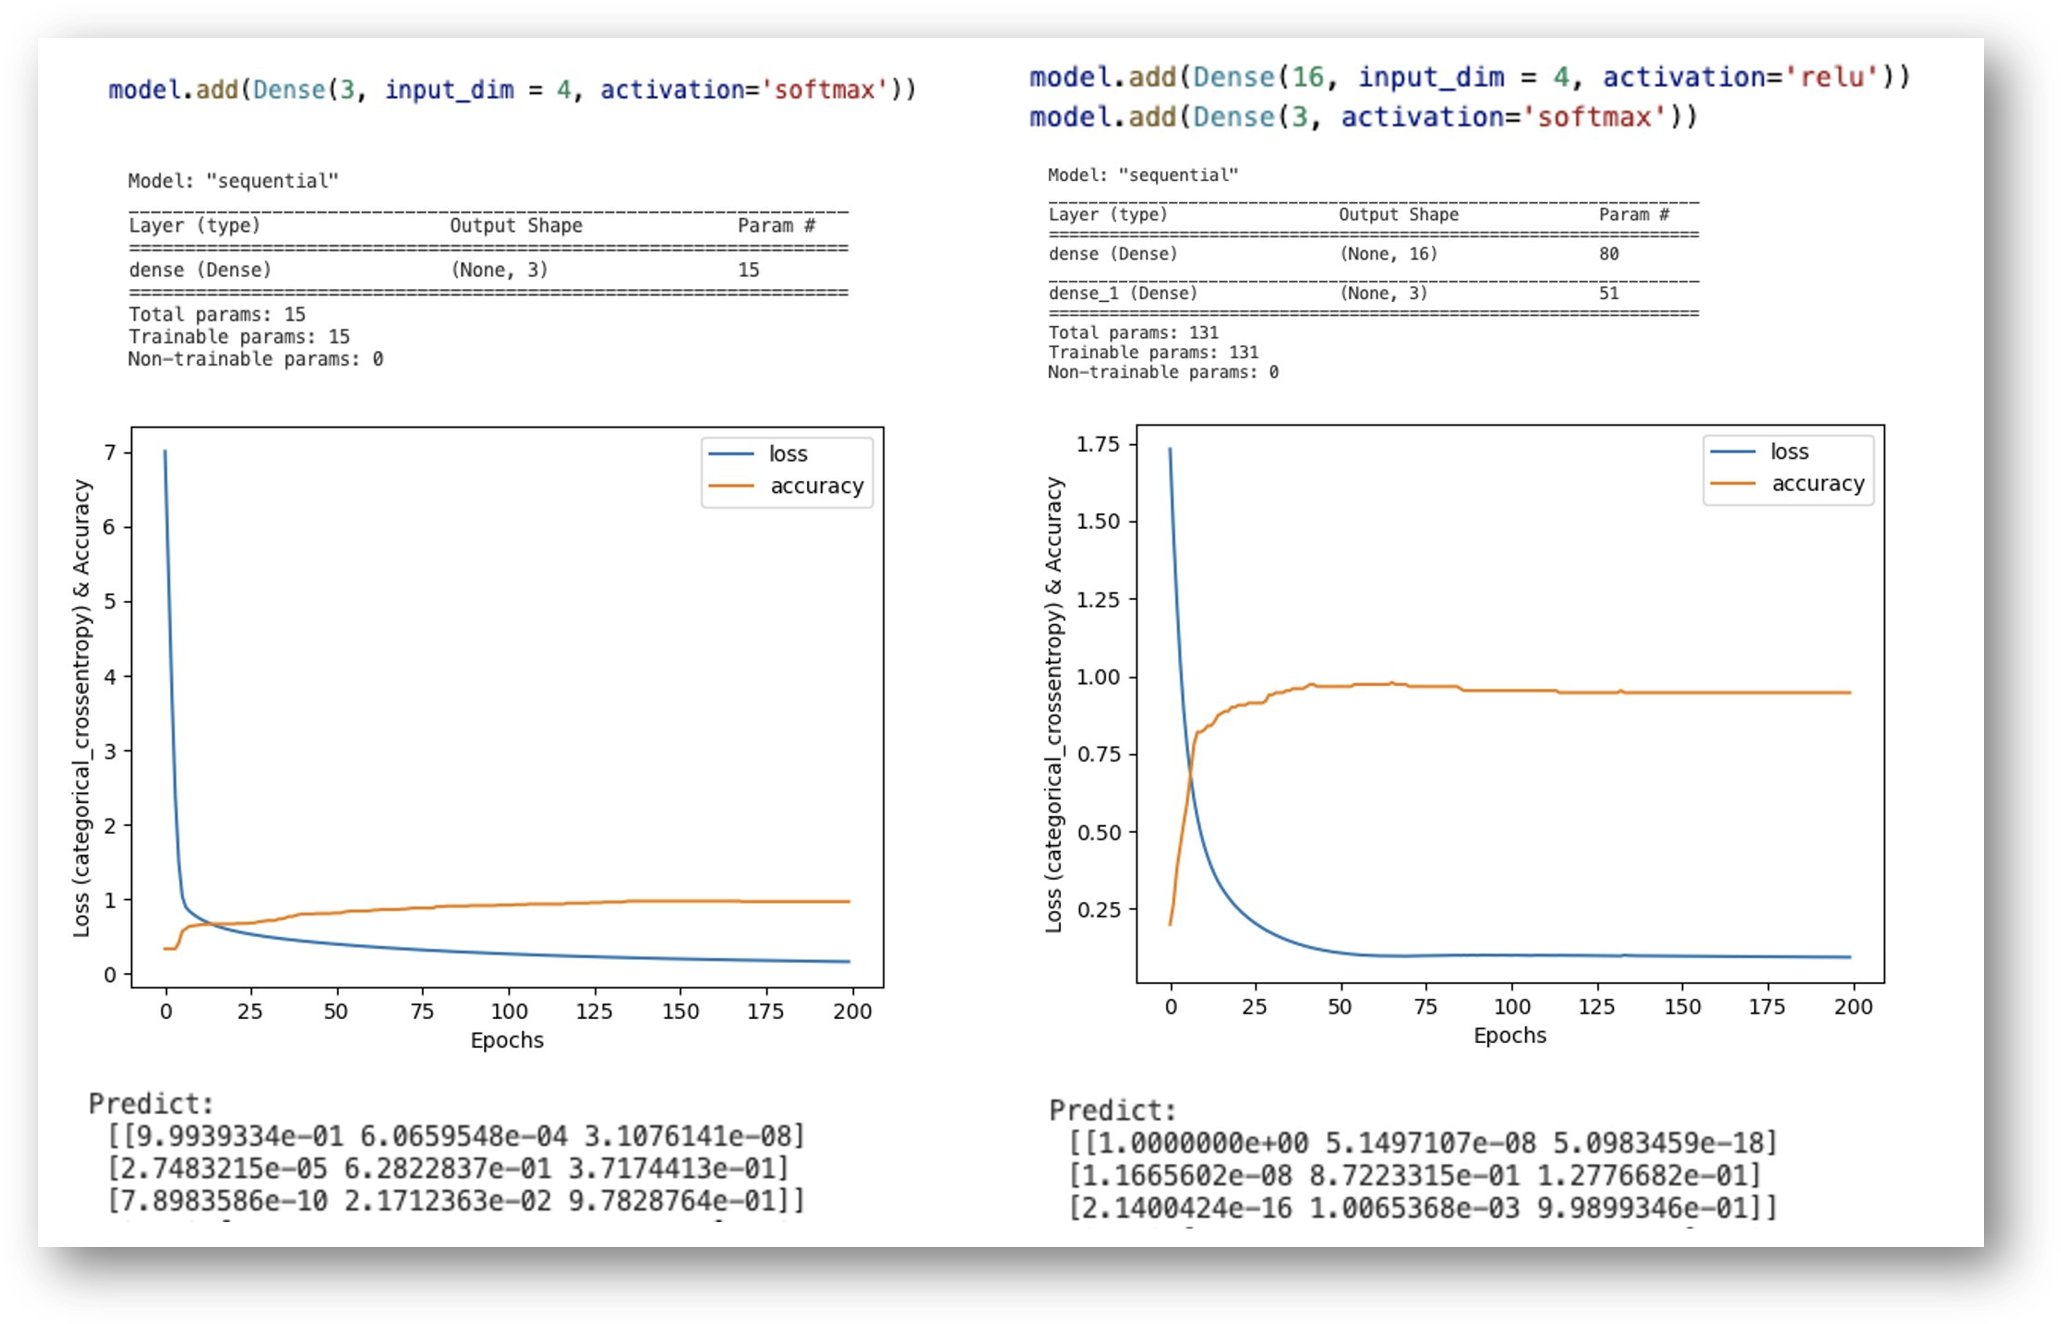
model.summary() 함수로 모델 정보를 확인하면 Training parameter는 15개이고, 학습 회수(ephocs 값)가 200 이면 accuracy =0.96의 값을 가집니다. 임의의 입력 값 [4.7, 3.2, 1.3, .2], [6.1, 2.9, 4.7, 1.4], [7.2, 3.6, 6.1, 2.5]]에 대해서 predict를 하면 첫 번째 값은 [9.9939334e-01, 6.06595484e-04, 3.10761414e-08] 값으로 setosa의 확률이 가장 높고, 두 번째 값은 [2.7483215e-05, 6.2822837e-01, 3.7174413e-08] 값으로 versicolor, 마지막 예측 값은 [7.8983586e-10 2.171263e-02 9.7828764e-01]으로 virginica 일 확률이 가장 높습니다.
Softmax regression의 모델의 예측 정확도를 향상하기 위해서 Model에 Neural Net의 hidden layer를 추가할 수 있습니다. Hidden layer는 output은 16개의 parameter로 구성하고 relu activation함수를 사용합니다. (16개의 값은 임의로 입력 가능합니다.)
# model: linear regression input dense with dim = 3
model = Sequential()
# Neural Net : hidden layer추가
if nn:
model.add(Dense(16, input_dim = 4, activation='relu'))
model.add(Dense(3, activation='softmax'))
else:
model.add(Dense(3, input_dim = 4, activation='softmax'))
Neural Net의 Hidde layer를 추가하면 131개의 training parameter로 구성됩니다. 위의 코드를 적용해서 기계 학습을 시키면 epochs 값이 50번 이후에는 loss 값과 accuracy가 안정화되고, 정확도도 다소 향상됩니다. 동일한 입력 값으로 predict 값을 확인하면 1에 더 가까운 값으로 예측함을 알 수 있습니다. 이후에 신경망에 대해서는 별도로 포스팅 예정이며, 현재 시점에서는 Hidden layer를 추가함으로써 Training parameter가 증가하고, 예측 결과는 보다 정확해질 수 있는 정도 이해했으면 합니다.

앞에서 설명한 Sample code는 GitHub에서 04_softmax_regression.py를 확인해주세요. 최신 Keras 버전에서 에러 나는 부분을 수정하고, Graph 생성 부분을 추가하였습니다.
#!/usr/bin/env python3
# -*- coding:utf-8 -*-
import numpy as np
import pandas as pd

from tensorflow.keras.models import Sequential
from tensorflow.keras.layers import Dense
from tensorflow.keras import optimizers
from tensorflow.keras.utils import to_categorical

from sklearn.preprocessing import LabelEncoder
import matplotlib.pyplot as plt

def soft_max():
    df = pd.read_csv('iris.csv')
    print (df)

    X = df.values[0:, 1:5].astype(float)
    Y = df.values[0:, 5]
    #print (X)
    #print (Y)

    # one-shot encoding
    encoder = LabelEncoder()
    encoder.fit(Y)
    Y_encoded = to_categorical(encoder.transform(Y))
    # print (Y_encoded)

    # model: linear regression input dense with dim = 3
    nn = True
    model = Sequential()
    if nn:
        model.add(Dense(16, input_dim = 4, activation='relu'))
        model.add(Dense(3, activation='softmax'))
    else:
        model.add(Dense(3, input_dim = 4, activation='softmax'))

    # model compile:
    model.compile(loss='categorical_crossentropy', optimizer='adam', metrics=['accuracy'])

    # model fit
    history = model.fit(X, Y_encoded, epochs=200, batch_size=1, shuffle=False)

    # prediction
    predict = model.predict([[4.7, 3.2, 1.3, .2], [6.1, 2.9, 4.7, 1.4], [7.2,3.6,6.1,2.5]])
    print ('Predict:\n',  predict)

    # evalue
    loss_and_metric = model.evaluate(X, Y_encoded, batch_size=1)
    print ('Evaluate:\n', loss_and_metric)

    # 학습 정확성 값과 검증 정확성 값을 플롯팅 합니다.
    # #print(history.history)
    plt.plot(history.history['loss'])
    plt.plot(history.history['accuracy'])
    plt.ylabel('Loss (categorical_crossentropy) & Accuracy')
    plt.legend(['loss', 'accuracy'])
    plt.xlabel('Epochs')
    plt.savefig('04_softmax_loss.png')
    #plt.show()

    # print model summary
    print ('Model summary:\n')
    model.summary()


if __name__ == '__main__':
    # test_onehot_encode()
    soft_max()
관련 글
[SW 개발/Data 분석 (RDB, NoSQL, Dataframe)] - Python Keras를 이용한 Linear regression 예측 (Sample code)
[SW 개발/Data 분석 (RDB, NoSQL, Dataframe)] - Python Pandas로 Excel과 CSV 파일 입출력 방법
[SW 개발/Python] - Python 정규식(Regular Expression) re 모듈 사용법 및 예제
[SW 개발/Python] - Python: JSON 개념과 json 모듈 사용법
댓글